
 Megghy.com
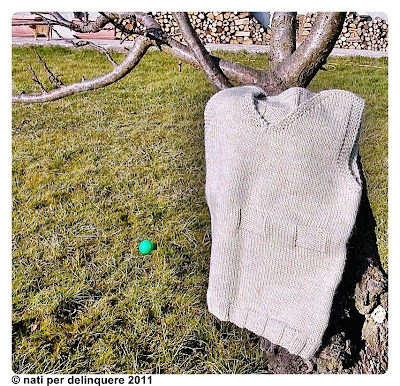


 Rispondi Citando
(da KnitsKnotsButtonBows)

 LinkBack URL
 About LinkBacks
 Moderatrice


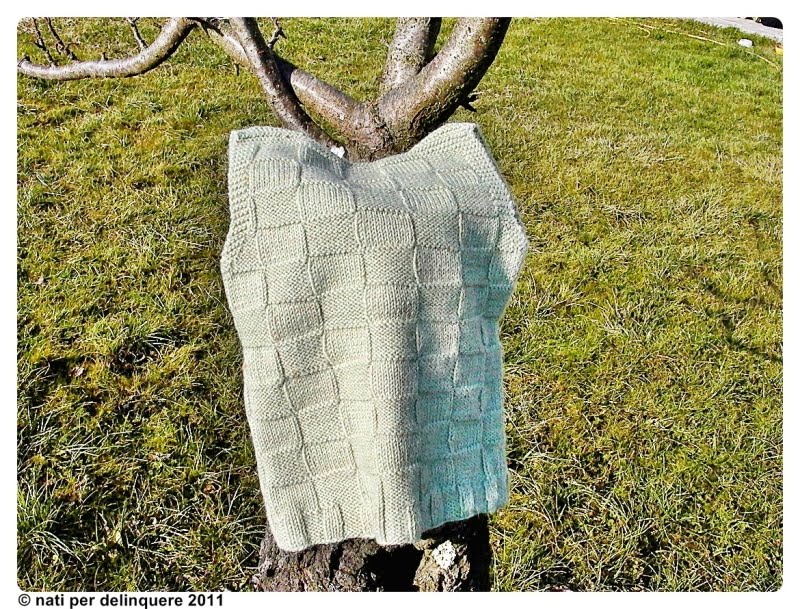
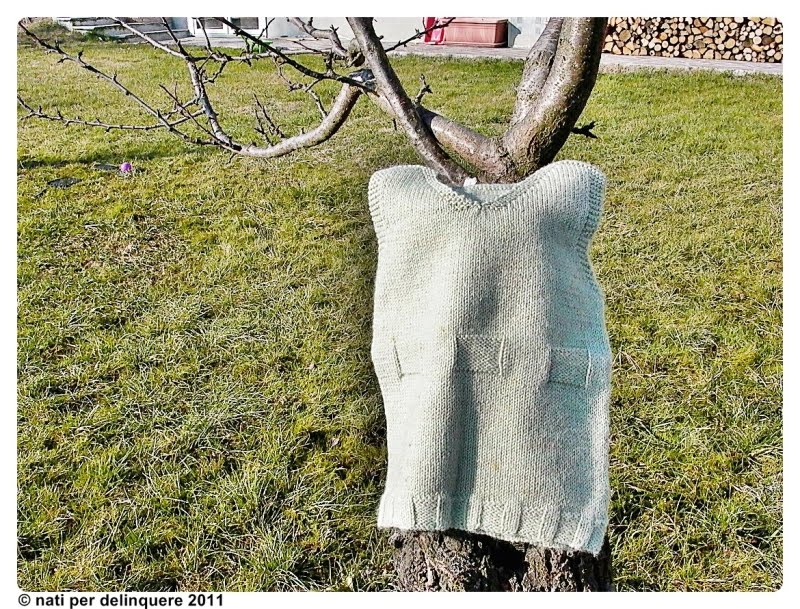
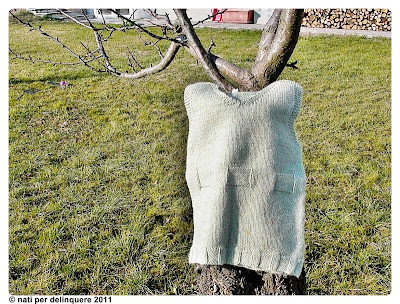
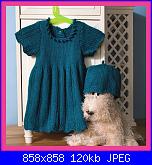
Maglia libera tutti!! questo originale gilet......
Si realizza un gilet con il davanti a maglia rasata, collo senza inserti e “cintura” in vita. La parte
posteriore è interamente a quadrotti.
OCCORRENTE
150 gr circa di lana
Ferri n.4
Ago da lana
REALIZZAZIONE (per bambino/a 3-4 anni)
BORDO A COSTA
Gettare 80 maglie e lavorare i primi 10 ferri nel modo seguente per creare il bordo inferiore (per il davanti e per il dietro):
- 5 rov, 3 dir (1^-3^-5^-7^-9^ferro)
- 3rov, 5 dir (2^-4^-6^-8^-10^ ferro)
DAVANTI
Davanti dopo il bordo a salire:
- 40 ferri a maglia rasata (1 ferro dir, 1 ferro rov)
- 10 rov, 10 dir (1^-3^-5^-7^-9^ferro) – cintura (davanti del lavoro)
- 10rov, 10 dir (2^-4^-6^-8^-10^ ferro) – cintura (dietro del lavoro)
- 10 ferri maglia rasata (1 ferro dir, 1 ferro rov)
- 5 dir, 70 dir, 5 dir
- 5 dir, 70 rov, 5 dir
- pass 2 ins, 4 dir, 68 dir, 4 dir, 2 ins dir
- [*5 dir, 68 rov, 5 dir
- pass 2 ins, 4 dir, 68 dir, 4 dir, 2 ins dir*]
- ripetere [**] fino ad arrivare a
- 5dir, 60 dir, 5 dir
- 5 dir, 60 rov, 5 dir
Effettuare lo scollo centrale a V chiudendo le maglie solo al diritto e bordando 4 dir da ambo le parti. La giunta alle spalle sarà effettuata con 8 ferri finali sempre al diritto:
* pass 2 ins, 4 dir, 68 dir, 4 dir, 2 ins dir
* 5 dir, 68 rov, 5 dir
* chiudere
DIETRO
Dietro dopo il bordo a salire:
- [**10 dir, 10 rov (davanti)
- 10dir, 10 rov (dietro)
da ripetere per 10 ferri, poi:
- 10 rov, 10 dir
- 10rov, 10 dir
da ripetere per 10 ferri**]
Ripetere [** **] per 3 volte (l’equivalente di 60 ferri), poi
- 10 dir, 10 rov
Per calare il giro manica dietro:
- [***5 dir, 5 rov, 10 dir, 10 rov, 10 dir, 10 rov , 10 dir, 5 rov, 5 dir
- pass 2 ins, 4 dir, 4 rov, 10 dir, 10 rov, 10 dir, 10 rov , 10 dir, 4 rov, 4 dir, 2 ins dir(davanti)
- 5 dir, 4 dir, 10 rov, 10 dir, 10 rov, 10 dir , 10 rov, 4 dir, 5 dir
- pass 2 ins, 4 dir, 3 rov, 10 dir, 10 rov, 10 dir, 10 rov , 10 dir, 3 rov, 4 dir, 2 ins dir***](davanti)
ripetere [*** ***] fino ad arrivare con:
- 5 dir, 10 rov, 10 dir, 10 rov, 10 dir, 10 rov , 5 dir (davanti)
- 5 dir, 10 dir, 10 rov, 10 dir, 10 rov, 10 dir , 5 dir (dietro)
Ripetere alter 9 volte:
- 5 dir, 10 rov, 10 dir, 10 rov, 10 dir, 10 rov , 5 dir (davanti)
- 5 dir, 10 dir, 10 rov, 10 dir, 10 rov, 10 dir , 5 dir (dietro)
Poi
- 5 dir, 10 dir, 10 rov, 10 dir, 10 rov, 10 dir , 5 dir (davanti)
- 5 dir, 10 rov, 10 dir, 10 rov, 10 dir, 10 rov , 5 dir (dietro)
E poi:
- 5 dir, 10 rov, 10 dir, 10 rov, 10 dir, 10 rov , 5 dir (davanti)
- 5 dir, 10 dir, 10 rov, 10 dir, 10 rov, 10 dir , 5 dir (dietro)
Eseguire 6 ferri al diritto e chiudere.
Cucire con ago da lana e punto invisibile su maglia rasata.
Ultima modifica di marinasmn; 22-06-2012 alle 17:47
 Crocettina Platinum

(da KnitsKnotsButtonBows)


Marina :maglia:
E' importante non limitarsi ad aiutare qualcuno per dovere o per diletto.
Se lo si fa con amore e compassione, con un sorriso e con parole gentili,
si procura di certo una gioia agli altri.
L'atto in se stesso può sembrare identico,ma i benefici che esso comporta sono infinitamente superiori.
(Dalai Lama)
Crocettina Platinum

questa
è una variante del modello precedente
e questo è il cappellino coordinato
Ultima modifica di Nick-name; 25-04-2011 alle 08:26
E' importante non limitarsi ad aiutare qualcuno per dovere o per diletto.
Se lo si fa con amore e compassione, con un sorriso e con parole gentili,
si procura di certo una gioia agli altri.
L'atto in se stesso può sembrare identico,ma i benefici che esso comporta sono infinitamente superiori.
(Dalai Lama)
Crocettina Platinum
E' importante non limitarsi ad aiutare qualcuno per dovere o per diletto.
Se lo si fa con amore e compassione, con un sorriso e con parole gentili,
si procura di certo una gioia agli altri.
L'atto in se stesso può sembrare identico,ma i benefici che esso comporta sono infinitamente superiori.
(Dalai Lama)
Moderatrice

Panda Silk DK Girl's Dress - free knitting pattern from Crystal Palace Yarns link bellissimo e pieno di modelli!!!!
Little Girl's Dress in Panda Silk DK
Panda Silk DK Little Girl Dress
free knitted dress pattern for little girl
Designed by Gail Tanquary for Crystal Palace Yarns
Description: This adorably sweet little girl’s dress has raglan sleeves and eyelet accents, finished off with a beautiful ribbon waistband.
Level: Advanced Beginner to Intermediate
Sizes: Child size 1 (2, 3, 4, 5, 6) yrs
Materials:
4 (5, 6, 8, 9, 10) – 50 gm balls of Crystal Palace Panda Silk DK (bamboo-SW wool-silk)
Crystal Palace Bamboo needles
16” circular needle - size 3
26” circular needle - size 5
26” circular needle - size 8
9" Straight needles - size 5
1½ yds ⅜” ribbon
Buttons 4 (4, 5, 5, 6, 6)
Gauge: 22 sts = 4” (top of dress) 20 sts = 4” (skirt)
Abbreviations: BO- bind off; CO- cast on; cont- continue; k- Knit; K2tog- knit 2 sts together; p- Purl; PM- place marker, PRM- place raglan marker; rep- repeat; rnd- round; RS– right side; ssk– slip slip knit; St st- stockinette stitch (k on the RS and p on the WS); st(s)- stitch(es); tog – together; WS- wrong side; yo- yarn over
Instructions:
Using size 3 – 16” circular needle, CO 85 sts for all sizes. Beginning with a WS row and a purl st, work 3 rows in k1x p1 rib, ending with a WS row.
Buttonhole row: Work rib to last 4 sts, yo, K2 tog, p1, k1.
Work 2 more rows in rib, ending with a RS row. Change to size 5 – 26” circular needle and work next row (WS) as follows:
Rib 8 for button band, PM
Purl 9 for left back, PRM
Purl 12 for sleeve, PRM
Purl 2, place odd colored marker, purl 23 for pattern panel, place odd-colored
marker, purl 2, PRM
Purl 12 for right sleeve, PRM
Purl 9 for right back, PM
Rib 8 for button band.
Next row (RS): Rib across button band, sl marker, (K to within 1 st of next raglan marker, yo, K1, sl marker, K1, yo) 4 times – 8 increases (4 raglans) made. K to last marker, sl marker, work rib to end.
Next row: Rib across button band, purl to last marker, rib to end (slipping all markers)
Begin pattern:
Row 1 (RS): Rib 8, then making raglan increases at markers as above, knit to first odd-colored marker, P2, (K5, P2) 3 times, knit to rib making raglan increases, rib to end.
Row 2 (WS): Rib 8, purl to first odd-colored marker, K2, (P5, K2) three times, P to last
marker, rib to end.
Row 3: Repeat Row 1 to odd-colored marker, P2, (ssk, yo, K1, yo, k2 tog, P2) 3 times,
work as for Row 1 to end.
Row 4: Repeat Row 2.
Rep these 4 rows, making buttonholes every 8th row (always a RS row), until there are 30 (32, 33, 34, 35, 37) sts on each back section, including sts of button band, ending with a WS row. Work one RS row in pattern without raglan increases; work one WS row in pattern. Piece should measure 4 (4½, 5, 5¼, 5½, 6)” from neck ribbing.
Dividing row (RS): Work across sts of back in pattern (do not make raglan increases). Using size 5 straight needle, work across sleeve, leaving remaining sts on circular needle, using it as a holder. (Note: Divide the 2 sts between the yo increases, placing 1 st on the sleeve, the other st on the dress body).
On sleeve section only, work 5 (5, 5, 5, 7, 9) rows in St st, ending with a WS row.
Eyelet row (RS): K1, *yo, K2 tog* across sleeve.
P one row. Work 4 rows St st. BO loosely.
Work across sts of front with size 5 circular needle, eliminating raglan incs. Work across sts of second sleeve with size 5 straight needle. (Note: Make sure to divide the 2 sts between the yo increases, placing 1 st on the sleeve and the other st on the dress body.) Complete as for first sleeve.
Work across sts of back.
Next Row (WS): Rib 8, P to button band, Rib 8, joining back and front together.
Next Row: Rib 8, K to button band, Rib 8.
Next Row: Rib 8, P to button band, Rib 8.
Eyelet Row (RS): Rib 8, K1, (yo, K2 tog) to button band, rib to end.
Next Row: Rib 8, P to button band, Rib 8.
Next row (RS): Rib 8, increase in every st across by tipping the left needle forward and knitting into the purl bump one row below, then knit into the st on the needle. Rib last 8 sts. Change to size 8 circular needle.
Next Row: Rib across button band, purl to button band, rib button band.
Next Row: BO sts of button band, K to end (eliminate ribbing on button band) and join to knit skirt in the rnd.
Cont knitting skirt until dress measures 14 (16, 17, 20, 22, 24)” from top of neck.
Work eyelet rnd: *yo, K2 tog* all around. Knit 3 more rnds. BO loosely.
Fold on eyelet row and sl stitch hem into place for skirt and sleeves. Lace ribbon through eyelets at waist. Sew bottom of button band in place. Sew on buttons
Ultima modifica di marinasmn; 22-06-2012 alle 17:46
enfant (03-03-2011), vaniavignali (08-05-2011)
Moderatrice

Panda Layette Set
Knit in Panda Soy, Panda Superwash or Panda Cotton
Size 6 months
Needles: 1 Pair each Crystal Palace Bamboo, sizes 1 & 2 (or size to get gauge).
Material:
Panda Soy, Panda Superwash or Panda Cotton
(Model is shown in #2005 Pink Print Panda Soy)
Jacket: 2 - 50 gr balls.
Cap & Booties: 1 – 50 gr ball.
2 Stitch Holders
Gauge: 8 sts/inch in St st. on larger needles
[Take the time to check your gauge to be sure your project will be the correct size, if you knit at a slightly looser gauge the sizes will be larger.]
Abbreviations
K; knit; beg: beginning; BO: bind off; cont: continue; foll: following; inc: increase; K2tog: knit 2 sts together; P: purl; patt: pattern; psso: pass slipped st over; rep: repeat; rem: remaining; stockinette stitch; sl: slip; st(s): stitch(es); yo: yarn over
Jacket
Beg at bottom, with larger needles, cast on 191 sts, K 7 rows (4 ribs).
P 1 row, K 1 row, for inch, end with a P row, K first and last 4 sts on P rows for border.
The foll 13 rows form patt:
Row 1: K 5 *YO, K 2 tog, rep from *to last 4 sts, K 4.
Row 2: And all even rows, K 4, P to last 4 sts, K 4.
Row 3: K.
Row 5: K 7, *YO, K 2 tog, K 6, rep from *to last 6 sts, K 6.
Row 7: K 5, *K 2 tog, YO, K 1, YO, K 2 tog, K 3, repeat from * to last 5 sts, K 5.
Row 9: Same as Row 5.
Row 11: K.
Row 13: Same as Row 1.
P 1 row, K 1 row, until work measures 6”, ending with a P row.
Next row, K 52 sts, slip rem sts on st holder, turn, P back, keeping border on edge.
K 50 sts, K last 2 sts tog.
Cont to dec in this manner on each K row, 4 more times [47 sts] end with a P row.
Put these 47 sts on holder, place 87 sts from holder on needle for back, K 1 row, P 1 row.
Now K first 2 sts & last 2 sts tog on each K row, 5 times [77 sts].
Slip these 77 sts on holder with first 47 sts. Work on rem 52 sts to correspond to other front. Put on st holder.
Sleeves
With smaller needles, cast on 56 sts, K 2, P 2 for 1 inches.
Change to larger needles, K 1 row P 1 row for 1-1/4 inches.
Row 1: K 1, *YO, K 2 tog, repeat from *ending row, K 1.
Row 2 and all even rows: P.
Row 3: K.
Row 5: K 3, *YO, K 2 tog, K 6, repeat from *to last 3 sts, K 3.
Row 7: K 1, *K 2 tog, YO, K 1, YO, K 2, tog, K 3, repeat from *to last 2 sts, K 2.
Rows 9, 11, and 13: same as rows 5, 3, and 1.
Work St st until sleeve measures 5.5 inches from beg.
K 2 sts tog at beg and end of next 5 K rows [46 sts].
Work 2 rows even, end with a P row, put on st holder.
K other sleeve to correspond to first.
Place sts of first front, then sleeve, back, 2nd sleeve and other front on one needle [263 sts].
Yoke
Holding right side of work toward you, K 5, *K 2 tog, K 1, K 2 tog, K 1, K 2 tog, K 2, repeat from * 11 times, K 2 tog, K 1, (K 2 tog, 13 times), *K 1, K 2 tog, K 1, K 2 tog, K 2, K 2 tog, repeat from *11 times, K 1, K 2 tog, K 6, [182 sts].
First and alternate rows: K 4, P to last 4 sts, K 4.
Row 2: K 2, YO, K 2 tog (button-hole), K 2, *YO, K 3 tog, K 11, repeat from *12 times, YO, K 2 tog, K 6.
Row 4: K 6, *YO, K 2 tog, K 11 repeat from *12 times, YO, K 2 tog, K 6.
Row 6: K 6, *YO, K 3 tog, K 10, repeat from *12 times, YO, K 2 tog, K 6.
Row 8: K 6, *YO, K 2 tog, K 4, YO, K 2 tog, K 4, repeat from * 12 times, YO, K 2 tog, K 6.
Row 10: K 2, YO, K 2 tog (buttonhole), K 2 *YO, K 3 tog, K 1, K 2 tog, YO, K 1, YO, K 2 tog, K 3, repeat from * 12 times, YO, K 2 tog, K 6.
Row 12: K 6, * YO, K 2 tog, K 3, YO, K 2 tog, K 4, repeat from * 12 times, YO, K 2 tog, K 6.
This row finishes flower patt in yoke.
Cont decreasing in this manner, knitting 3 tog instead of 2 tog every 4th row, making 1 st less between eyelets every 4th row. Work 1 more buttonhole in 18th row, work 2 more rows after buttonhole.
Row 22: K 2, * YO, K 2 tog, YO, K 3 tog, repeat from * to last 3 sts, K 2 tog, K 1, [98 sts].
P back.
Change to smaller needles, work in K 2, P 2, ribbing for 5 rows, BO loosely.
Sew sleeve seams at beg of decreased rows to body of jacket. With 2 strands of yarn, crochet a cord of about 150 sts [or make an I-cord], run through eyelets, at neck or cord may be omitted, if desired.
Cap
With smaller needles, cast on 100 sts. Work in ribbing of K 2, P 2, for 1 inch.
Change to larger needles, K 1 row, P 1 row for 1/2 inch.
Foll patt as given for bottom of jacket to 5th row.
Start 5th row with K 6 instead of K 7.
7th row: start with K 4 instead of K 5, then K 1 row, P 1 row, until work measures 4 inches.
Cast on 6 sts at end of next row; cast on 7 sts at end of next row.
K 2 tog, K 11, * YO, K 3 tog, K 11, repeat from * 7 times, YO, K 2 tog.
Alternate rows: P.
Now K 2 tog, K 10, * YO, K 3 tog, K 10, repeat from * 7 times, YO, K 2 tog.
Cont to dec this manner, having 1 st less on each K row between eyelets until 25 sts remain.
K 2 tog across row. Break yarn and thread through rem sts. Draw tog and sew seam of crown to where sts were added.
With smaller needles, pick up 88 sts across bottom of cap and K 2 sts, P 2 sts, for 4 rows.
Next row, K 2, *YO, K 2 tog, repeat from * across row. K 2, P 2 for 4 rows,
Bind off.
Make a cord same as for jacket.
Panda Layette Set
Long Booties (shown in photo)
With smaller needles, cast on 40 sts, K 2, P 2, for 1 inch.
Change to larger needles, foll patt as given for sleeve of jacket.
K 1 row, P 1 row, until work measures 4 inches.
Eyelets: K 1, *YO, K 2 tog, repeat from * to last st, K 1. P back. Work St st for 6 rows.
Instep: K 27, turn, P 14, turn. On these 14 sts, work St st for 6 rows.
Pattern:
Row 1: K 7, YO, K 2 tog, K 5. P back.
Row 3: K 5, K 2 tog, YO, K 1, YO, K 2 tog, K 4. P back.
Row 5: Same as Row 1.
Cont in St st for 7 more rows, [18 rows] for instep, end with a P row, break thread.
Holding right side toward you, join yarn to side of instep, PU 15 sts on side of instep, K across instep sts, and PU 15 sts on other side of instep, K last 13 sts [70 sts].
K 7 rows even.
On next row, *dec 1 st at each edge and 4 sts spaced at equal distances apart.
K 5 rows even.
Rep from * 2 times (10 ribs), weave or bind off and sew seam at sole and back. With 2 strands of yarn, ch 90 sts, thread thru beading
Short Booties
With larger needles, CO 40 sts.
K 8 rows. K 1 row, P 1 row for 3 rows.
Foll patt as given for sleeve of jacket. Work St st for 3 rows.
Foll directions given for long bootie beg with eyelets.
Ultima modifica di marinasmn; 22-06-2012 alle 17:45
enfant (03-03-2011)
Moderatrice

Thank you to my 3-month old granddaughter, Nadia, for modeling.
Baby Bubbles Smock
free baby knitting pattern
One Size: 0-6 months, loose fitting garment, length approx. 10 inches (25 cm)
Increase length by knitting extra rows of bobble pattern as desired.
Materials
3 - 50 gr balls Panda Silk (bamboo-SW wool-silk) #3003 color "strawberry cream"
2 sizes Crystal Palace Bamboo Needles: larger size for 31 sts/4 inches, then 1 size smaller for ribbing. Thus if you get the gauge on size 2s, use 1.5-1s for ribbing & 16” circular needle in larger size for yoke.
4 Stitch Holders
Tapestry Needle for assembling
3 buttons
Abbreviations
K; knit; beg: beginning; cont: continue; foll: following; inc: increase; K2tog: knit 2 sts together; P: purl; patt: pattern; psso: pass slipped st over; rep: repeat; sl: slip; st(s): stitch(es); St st: stockinette stitch; tbl: through back of loop; tog: together; y fwd: yarn forward – bring yarn under needle, then over into knitting position again, thus making a st; yon: yarn over needle – take yarn over top of needle into knitting position, thus making a st; yrn: yarn round needle – take yarn right around needle into purling position, thus making a st
Bobble: (K1, y fwd, K1, y fwd, K1) into next st, turn, P5, turn, K5, turn, P5, turn, sl 2, K3 tog, psso
Gauge: 31 sts/4 inches (10 cm) in St st.
Please check your gauge carefully. If less sts use smaller needles, if more sts use bigger needles.
Back and Front (alike, make 2)
Using larger Needles, cast on 114 sts.
Work 4 rows St st.
5th row — K1, * K2 tog, y fwd, rep from * to last st, K1.
Work 5 rows St st (beg with a P row), dec once in center of last row [113 sts].
Beg pattern
1st row — P2, * yon, sl 1, K1, psso, P5, K2tog, yrn, P1, rep from * to last st, P1.
2ndrow—K3,*P1,K5,P1,K3, rep from * to end.
3rd row — P3, * yon, sl 1, K1, psso, P3, K2 tog, yrn, P3, rep from * to end.
4th row — K4, * P1, K3, P1, K5, rep from * ending last rep with K4 instead of K5.
5th row — P4, * yon, sl 1, K1, psso, P1, K2 tog, yrn, P5, rep from * ending last rep with P4 instead of P5.
6th row — K5, * P1, K1, P1, K7, rep from * ending last rep with K5 instead of K7.
7th row — P2, * P3, yon, sl 1, K2tog, psso, yrn, P3, "Bobble", rep from * ending last rep with P2 instead of "Bobble".
8th row — K5, * P3, K3, P1 tbi, K3, rep from * to last 8 sts, P3, K5.
9th row — P4, * K2tog, yrn, P1, yon, sl 1, K1, psso, P5, rep from * ending last rep with P4 instead of P5.
10th row — As 4th row.
11th row — P3, * K2 tog, yrn, P3, yon, sl 1, K1, psso, P3, rep from * to end.
12th row — As 2nd row.
13th row — P2, * K2 tog, yrn, P5, yon, sl 1, K1, psso, P1, rep from * to last st, P1.
14th row — K2, * P1, K7, P1, K1, rep from * to last st, K1.
15th row — K1, K2 tog, * yrn, P3, "Bobble", P3, yon, sl 1, K2 tog, psso, rep from * to last 10 sts, yrn, P3, "Bobble", P3, yon, sl 1, K1, psso, K1.
16th row — P3, * K3, P1 tbl, K3, P3, rep from * to end.
Rows 1 thru 16 form pattern.
Cont in patt until work measures approx 6 inches (15 cm) from row of holes at hem, ending with an 8th or 16th patt row.
Shape raglan armholes — Keeping patt correct, bind off 6 sts at beg of next 2 rows.
Dec at each end of next and alt rows until 93 sts rem.
Next row — * P2 tog, rep from * to last st, P1 [47 sts].
Leave sts on a stitch-holder.
Sleeves
Using larger Needles, cast on 40 sts.
Work 4 rows St st.
5th row — K1, * K2 tog, y fwd, rep from * to last st, K1.
Work 4 rows St st (beg with a purl row).
10th row — P1, * inc in next st, P2, rep from * to end [53 sts].
Work in patt as for Back and Front until work measures approx 6 inches (15 cm) or length desired from row of holes at hem, ending with an 8th or 16th patt row.
Shape raglan — Keeping patt correct, bind off 6 sts at beg of next 2 rows.
Dec at each end of next and alt rows until 33 sts rem.
Next row — * P2 tog, P1, rep from * to end [22 sts].
Leave sts on a stitch-holder.
Yoke
Using back-stitch, join raglan seams. With right side facing and beg at right back raglan seam, slip all sts from stitch-holders on to Circular Needle (matching larger size needle) [138 sts].
Slip first 26 sts of Back onto other end of needle.
1st row — Cast on 5 sts for underlap, knit to end, dec once in center of front [142 sts].
2nd and 3rd rows — Knit.
4th row — K5, * yrn, P2 tog, rep from * to last 5 sts, K5.
Knit 3 rows.
8th row — K5, purl to last 5 sts, K5.
9th row — K7, * K2 tog, K3, rep from * to last 5 sts, K5 [116 sts].
10th row — As 8th row.
11th row — Knit to last 3 sts, y fwd, K2tog (buttonhole), K1.
Rep rows 2 thru 8 once.
19th row — K7, * K2 tog, K2, rep from *to last 5 sts, K5 [90 sts].
Rep 10th and 11th rows once, then rows 2 thru 8 once.
29th row — K7, * K2 tog, K3, rep from * to last 3 sts, K3 [74 sts].
30th row — As 8th row.
Change to smaller Needles for Neckband.
1st row—Knit to last 3 sts, y fwd, K2 tog, K1.
Work 5 rows St st (beg with a purl row).
7th row — K1, * K2 tog, y fwd, rep from * to last st, K1.
Work a further 3 rows St st.
Bind off loosely.
Finishing
DO NOT PRESS. Using back-stitch, join side and sleeve seams. Fold lower, sleeve and neck edges on to wrong side at row of holes and slip-stitch in position. Sew underlap in position. Sew on buttons.
Ultima modifica di marinasmn; 22-06-2012 alle 17:36
enfant (03-03-2011)
Moderatrice

http://www.straw.com/cpy/patterns/ba...by-jacket.html
versione 1
versione 2 particolare dell'i-cord inserito nel collo
Crystal Palace Yarns
Bamboozle Baby Striped Jacket
Designed by Barbara Breiter
Occorrente:
Crystal Palace Bamboozle
(55% bamboo, 24% cotton, 21% Elastic Nylon)
Versione 1:
50 gr per ogni colore:
Color A-2304 Verde melange
Color B-3646 Giallino
Color C-0204 Avorio
Color D-9628 Pervinca
Color E-2204 grigio chiaro
Color F-9660 Viola
Versione 2:
3 gom colore di fondo (MC) melange bianco-verde-albicocca
2 gom albicocca (CC)
Se lo si realizza in tinta unita 4 gomitoli
ferri 5 mm
4 spille attesa maglie
Taglia : da 3 a 9 mesi
aum = lav 2 volte la maglia, una volta a dir, la seconda a dir ritorto
La costruzione è top-down, le prime ed ultime 3 m sono sempre lavorate a legaccio per i bordini davanti. Non sono previste asole, si chiude con un nastino o cordoncino a uncinetto o a maglia infilato a bordo collo (vedi foto).
nel caso si volessero realizzare le asole la prima dopo 4 ferri e le altre ogni 15 f circa, è anche possibile realizzare delle asole a uncinetto.
Si lavora avanti e indietro, con il col A montare 52 m,
f 1-3 = dir
f4 = dir del lav, ferro con i foretti per infilare il cordoncino - con i col B, 3 dir, *gett, 2 ins, 1 dir* rip da *a* per tutto il f, terminare con gett, 2 ins, 2 dir
f5 = dir
f6 = 2 dir, * aum, 1dir* rip da *a* per tutto il f, terminare con 2 dir (84 m)
f7 = 3 dir, rov, 3 dir
f8 = dir
f9-14= rip f7 e f8 x 3 volte
f15=rip f7
f16-18 = con il col F, dir
f19= 2 dir, * aum, 1 dir* rip da *a* 3 dir (124 m)
f20-27=con il col C, rip f8 e f7 per 4 volte
f28-30 =con il col F, dir
f31= 3 dir, (aum, 1 dir per 7 volte),3 dir, (aum, 3 dir, per 6 volte), (aum, 2 dir per 12 volte), 3 dir, (aum, 3 dir per 6 volte), (aum, 1 dir per 7 volte), 3 dir (162 m)
Divisione del lavoro:
f32 = con il col D, a dir in questo modo:
lav 28 m e metterle in attesa su una spilla (dav sin)
lav 27 m e metterle in attesa su una spilla (manica sin)
lav 52 m e metterle in attesa su una spilla (dietro)
lav 27 m e lasciarle sul ferro (manica ds)
passare senza lavorare le ultime 28 m su una spilla (dav ds)
Manica destra:
Continuando con il col D montare a nuovo 2 m all'nizio del ferro, 27 rov (29 m)
f seg= montare a nuovo 2 m all'inizio del ferro, 29 dir (31 m)
col il col D 11 ferri a maglia rasata
con il col F 4 ferri a dir
con il col E 12 ferri a maglia rasata
con il col F 4 ferri a dir
con il col C 8 ferri a maglia rasata
Polsino
con il col A (6dir, 2 ins per 3 volte) 4 dir, 2 ins, 1 dir
3 f a dir
Chiudere tutte m molto morbidamente
Manica sinistra
Riprendere le 27 m della manica sin in attesa sulla spilla e lavorare come spiegato per la man ds.
Corpo del golfino
riprendere sul ferro le 28 m non lavorate del dav ds , e lavorarle a dir con il col D, girare il lav
rov del lav = 3 dir, 25 rov, montare a nuovo 4 m, riprendere sul ferro le 52 m del dietro in attesa sulla spilla e lavorarle a rov, montare a nuovo 4m, riprendere di seguito le ultime 28 m in attesa del dav sin, 25 rov, 3 dir (116m)
f1 = dir del lav - dir
f2 = rov del lav - 3 dir, rov, 3 dir
Ripetere f1 e f2 ancora 6 volte
con il col F, 4 ferri a dir
con il col E, rip f1 e f2 per 6 volte
con il col F, 4 ferri a dir
con il col C, rip f1 e f2 per 6 volte
con il col A, 4 f a dir
Confezione
Cucire le maniche sotto e i sottomanica (ascella)
Realizzare un cordoncino aun cinetto o un i-cor di 3 m lunghi circa 80 cm e infilarlo dentro il giro a buchini del collo.
Ultima modifica di marinasmn; 22-06-2012 alle 17:34
enfant (03-03-2011), manuela62 (22-07-2011), puffetta68 (12-10-2011)
Moderatrice

Bunny Hop Butterfly Stitch
Baby Pullover
Taglia 3-6 (6-12, 12-24) mesi
Occorente:
3 (3,4) gomitoli da 50 gr di filato Bunny Hop - Colore 9800
ferri 3,5 e 4 mm
spille per attesa maglie
6 bottoni
Campione:
22 m x 32 ferri = 10 cm
Tecniche e punti impiegati:
maglia rasata
costa 1/1
Punto farfalla:
f1: dir
f2: rov
f 3 e 4: come f1 e f2
f5: 4 dir (K4(1, 4), *pass senza lavorare 5 m prendendole a rov, portando il filo davanti e tenerlo lento, 5 dir * rip da * a * per tutto il ferro, terminare con 4 dir
f6: rov
f7-10 : rip f5 e f 6 per due volte
f11: 6 dir,* con la punta del ferro sollevare i 3 fili prendendoli da sotto e lavorare la prossima maglia . 9 dir* rip per tutto il ferro, terminare con 6 dir.
f12: rov
f13: dir
f14: rov
f15 e f16:come f13 e f 14
f17: 9 dir, *pass senza lavorare 5 m prendendole a rov, portando il filo davanti e tenerlo lento, 5 dir * rip da * a * per tutto il ferro , treminare con 4 dir
f18: rov
f19-22: rip f 17 e f18 per 2 volte
f23: 11 dir , *con la punta del ferro sollevare i 3 fili prendendoli da sotto e lavorare la prossima maglia a dir, 9 dir* terminare con 11 dir
f24: rov
Questi 24 f formano il punto a farfalla
aum = lavorare 2 volte la stessa maglia, la prima a diritto normale, la seconda a diritto ritorto
DIETRO
Con i ferri 3,5mm montare 45(49, 55) m.
Lavorare 9 ferri a costa 1/1, iniziando e finendo il primo ferro con 1 dir (dir del lav)
f10 = (rov del lav)continuando a costa 1/1 aumentare come segue: 2(4-7) m , 1 aum, *6 m, 1 aum* per tutto il ferro, terminare con 1 (3-6)m (53-57-63m)**
Cambiare con i ferri del 4mm, e lavorare a punto farfalla.
Il punto farfalla è composto da 24 ferri, per le tre misure lavorare il punto come segue:
3-6 m = 2 volte i 24 ferri, e 1 volta dal f1 al f16
6-12 m = 3 volte i 24 ferri, e 1 volta dal f1 al f4
12-24 m= 3 volte i 24 ferri e 1 volta dal f1 al f16
Scollatura dietro
Prossimo ferro:
14(14-16)m a punto farfalla, 5(5, 9) dir, girare. Lasciare in attesa l'altra parte su una spilla.
Continuando a punto farfalla diminuire 1 m ogni 6 ferri fino ad avere 13 (15-17 m) sul ferro***
f seg = a rov
Cambiare con i ferri del 3,5 mm e lavorare 6 ferri a costa 1/1 per il bordino dell'abbonatura sulla spalla. Chiudere intrecciando le maglie a costa 1/1.
Per l'altra parte della scollatura, sul diritto del lav, mettere in attesa su una spilla le 15 (15, 17) m centrali , eseguire la scollatura dell'altro lato come spiegato.
Per il bordo scollo, sul diritto del lavoro, con i ferri 3,5mm riprendere 12 m dal lato della scollatura (compresi i 6 f a costa 1/1) , riprendere le m in attesa sulla spilla, riprendere 12m dall'altro lato e lavorare 6 f a costa 1/1. (39-39-41m)
Chiudere tutte le maglie lavorando a costa 1/1.
DAVANTI
Lavorare come per il dietro fino al punto **, cambiare con i f 4 mm e continuare a punto farfalla come segue:
Il punto farfalla è composto da 24 ferri, per le tre misure lavorare il punto come segue:
3-6 m = 2 volte i 24 ferri, e 1 volta dal f1 al f4
6-12 m = 3 volte i 24 ferri, e 1 volta dal f1 al 16
12-24 m= 3 volte i 24 ferri e 1 volta dal f1 al f4
Scollatura davanti
Lavorare come il dietro fino al punto ***.
Lavorare 13 f a punto farfalla.
Cambiare con i ferri del 3,5 mm e lavorare 2 f a costa 1/1.
f seg = (asole) lavorando a costa 1/1, fare 2 occhielli (1 gett, 2 ins) , il primo dopo 3 m e l'ultimo prime delle ultime 3 m del ferro
Continuare a costa 1/1 per altri 4 f. Chiudere tutte le maglie lavorando a costa 1/1.
Per l'altra parte della scollatura , sul dir del lav, mettere le 15 m centrali in attesa su una spilla, continuare a punto farfalla per 13 f
Cambiare con i ferri del 3,5 mm e lavorare 2 f a costa 1/1.
f seg = (asole) lavorando a costa 1/1, fare 2 occhielli (1 gett, 2 ins) , il primo dopo 3 m e l'ultimo prima delle ultime 3 m del ferro
Continuare a costa 1/1 per altri 4 f. Chiudere tutte le maglie lavorando a costa 1/1.
Per il bordo scollo, sul diritto del lavoro, con i ferri 3,5mm riprendere 16 m dal lato della scollatura (compresi i 6 f a costa 1/1) , riprendere le m in attesa sulla spilla, riprendere 16m dall'altro lato e lavorare 2 f a costa 1/1. (47-47-49m)
f seg = (asole) lavorando a costa 1/1, fare 2 occhielli (1 gett, 2 ins) , il primo dopo 3 m e l'ultimo prima delle ultime 3 m del ferro
Continuare a costa 1/1 per altri 4 f. Chiudere tutte le maglie lavorando a costa 1/1.
MANICHE
Con i ferri 3,5mm montare 23(27, 33), lavorare 7 (7-9) ferri a costa 1/1, iniziando e finendo il primo ferro con 1 dir e terminando sul dir del lav.
f seg = (rov del lav)continuando a costa 1/1 aumentare come segue:
*2(4-3) m , 1 aum,* per tutto il ferro
Cambiare con i ferri del 4mm , e lavorare a punto farfalla , aumentando all'inizio e alla fine del ferro 1 m, ogni 3 (4-5) ferri, fin o ad avere 53 (57-63) maglie sul ferro.
Lavorare ancora 6 (8-12) f a punto farfalla. Chiudere tutte le maglie molto morbidamente.
Confezione
Sovrappore le bande di abbottonatura sulle spalle, cucire i bottoni in corrispondenza delle asole e fissare con dei punti nascosti le due bande in corrispondenza del giro manica.
Ora misurare dal centro della spalla 12(13.5,14.5)cm, e a partire dal quel punto cucire i fianchi.
Cucire le maniche sotto e attaccarle allo scalfo.
Ultima modifica di marinasmn; 22-06-2012 alle 17:33
enfant (03-03-2011)
Moderatrice

This sweater is yet another adaptation of the 5 Hour Baby Sweater originally posted on Knit List. There are several adaptations on Bev’s Country Cottage. Being larger it takes longer to knit, hence the 7 Hour Toddler Girl's Sweater.
Thank you Virginia for testing this pattern.
SIZE: 12-18 months
Garment measures 25 inches around, would fit about 22 inch
MATERIALS:
Approximately 6 ounces worsted weight yarn (I used Red Heart Super Saver Honeydew)
1 ¾ inch button
Size US 10 (6.0 mm)
Stitch holders or waste yarn
Markers
Tapestry needle
GAUGE: Approximately 4 sts to 1 inch
NOTES:
1. Read instructions all the way through before beginning.
2. I used a 29 inch circular needle.
3. I used waste yarn rather than stitch holders.
4. There isn’t enough yarn in a multicolor Red Heart Super Saver, so either choose a solid color or buy two of the multicolor.
SPECIAL STITCHES:
M1: Make a backward loop and place on right hand needle.
Increase (inc) 1 st in next st: Knit into front and back of that stitch.
DIRECTIONS:
Starting at the neck edge, cast on 37 stitches, using “knitted on cast-on”.
YOKE:
Rows 1 - 3: Knit. (37 sts)
Row 4 (buttonhole): Knit to last 4 sts, K2tog, YO, knit 2 (37 sts)
Row 5: K5, P to last 5 sts, K5. (37 sts)
(Always keep first 5 and last 5 sts in 'knit' even on p row.)
Row 6: K5, * increase 1 in next st, K1, repeat from * to last 6 sts, end with increase 1, K5. (51 sts)
Row 7: K5, P to last 5 sts, K5. (51 sts)
Row 8: K5 *K2tog. Repeat from * ending K6 (31 sts)
Row 9: K5 *K1, insert needle under next horizontal loop of row below (between sts) and knit this st. Repeat from * across, ending K6 (51 sts)
Row 10: K5, *inc 1 in next st., K2, repeat from * to last 7 sts, ending inc. 1, K6. (65 sts)
Row 11: K5, P to last 5 sts, K5. (65 sts)
Row 12: K5, *K2 tog. Repeat from * ending K6 (38 st)
Row 13: K5 *K1, insert needle under next horizontal loop of row below (between sts) and knit this st. Repeat from * across, ending K6 (65 sts)
Row 14: K6 *inc in next st, K3, repeat from * to last 7 sts, ending with inc. 1, K6. (79 sts)
Row 15: K5, P to last 5 sts, K5. (79 sts)
Row 16: K5, *K2 tog. Repeat from * ending K6 (38 st)
Row 17: K5 *K1, insert needle under next horizontal loop of row below (between sts) and knit this st. Repeat from * across, ending K6 (79 sts)
Row 18: K6 *increase in next st, K4, repeat from * to last 8 sts., ending increase 1, knit 7. (93 sts)
Row 19: K5, P to last 5 sts, K5. (93 sts)
Row 20: K5, *K2 tog. Repeat from * ending K6 (52 st)
R
ow 21: K5 *K1, insert needle under next horizontal loop of row below (between sts) and knit this st. Repeat from * across, ending K6 (93 sts)
Row 22: K7*increase in next st, K5, repeat from * to last 8 sts, ending increase 1, knit 7. (107 sts)
Row 23: K5, P to last 5 sts, K5. (107 sts)
Row 24: Knit. K5, *K2 tog. Repeat from * ending K6 (59 st)
Row 25: K5 *K1, insert needle under next horizontal loop of row below (between sts) and knit this st. Repeat from * across, ending K6 (93 sts)
Row 26: K8*increase in next st, K6, repeat from * to last 8 sts, ending increase 1, knit 7. (121 sts)
Row 27: K5, P to last 5 sts, K5. (121 sts)
Row 28: K5,*K2 tog. Repeat from * ending K6 (66 st)
Row 29: K5 *K1, insert needle under next horizontal loop of row below (between sts) and knit this st. Repeat from * across, ending K6 (121 sts)
Row 30: You will now be placing markers to show positions of fronts, back, and sleeves:
K6, M1, K7, M1, K6, M1,K1, pm (23 sts for front),
K1, M1, K7, M1, K6, M1, K7, M1, K1, pm (26 sts for sleeve),
K1, M1, (K7, M1)five times, K1, pm (43 sts for back),
K1, M1, K7, M1, K6, M1, K7, M1, K1, pm (26 sts for other sleeve),
K1, M1, K6, M1, K7, M1, K6 (23 sts for other front).
Row 31: K5, P to last 5 sts, K5. (141 sts)
Row 32: Knit across row, increasing 1 st before and after each marker. (149 sts)
Row 33: K5, P to last 5 sts, K5. (149 sts)
Row 34: Knit across row, increasing 1 st before and after each marker. (157 sts)
Row 35: K5, P to last 5 sts, K5. (157 sts)
SLEEVES:
Knit 25 sts and place on a holder or waste yarn. CO 2 sts and knit across the next 30 sts (first sleeve), CO 2 sts, Working with another set of needles and on these 34 sts, work in stockinette stitch for 30 rows.
Sleeve Decrease Row: (WS) K1, (K2 tog, K3) 6 times, K2tog, K1. (27 sts)Knit 7 rows.
Bind off leaving last stitch on needle. With right sides together slip stitch sleeve closed being careful to close up all the holes at the underarm. Place last stitch on left hand needle. Knit 2 tog and knit across to next marker. Place sweater back stitches that you just knit on a stitch holder or piece of waste yarn.
Work second sleeve same as first.
SWEATER BODY:
Knit across remaining stitches (Body Row 1) and now work body of sweater.
Body Row 2: K 5, purl to last 5 sts, K5. (97 sts)
Body Row 3: Knit. (97 sts) (97 sts)
Body Row 4: K5, purl to last 5 sts, K5. (97 sts)
Body Rows 5-30: repeat Body Rows 3 and 4. (97 sts)
Knit 8 rows.
Bind off.
Weave in ends and sew on button.
enfant (03-03-2011)
 Permessi di Scrittura


Segnalibri