Pagina 2 di 5 PrimaPrima 1234 ... UltimaUltima
Risultati da 11 a 20 di 44

Discussione: Modelli scarpine in feltro: idee dal web

  1. #11
    Nick-name Guest

  2. Per questo Post, l'utente Nick-name e' stato ringraziato da:

    manulella (11-04-2011)

  3. #12
    Nick-name Guest

    Predefinito


    http://www.favecrafts.com/master_ima...by-Booties.pdf x scaicare modello grandezza naturale


    happy feet


    Materials:
    • 24cm x 30cm wide (9 1/2″ x 12″) piece of wool felt for one pair of booties
    • 60cm (23 5/8″) narrow ribbon for the ties
    • Threads
    • Stranded cottons to complement the sea green and white color of the felt
    • Tracing paper
    • Sharp pencil
    • Water-soluble fabric marker
    • No. 8 sharp needle
    • No. 22 chenille needle
    • How to Make the Booties

    Patterns and Templates:
    Click here to download the bootie pattern, embroidery and appliqué templates PDF. Use the pencil to trace the pattern pieces and placement marks onto tracing paper. Cut out. Use the large needle to pierce holes at the marked positions for the shoelace and at the center front of the toe piece. Make a template for your chosen bootie motif in the same way.
    CUTTING OUT
    Referring to the cutting layout, trace each bootie piece twice onto the felt and mark the dots through the pierced holes using the fabric marker. Cut out the pieces.
    CUTTING LAYOUT
    1. Sole
    2. Back
    3. Toe
    Green Booties with Stars


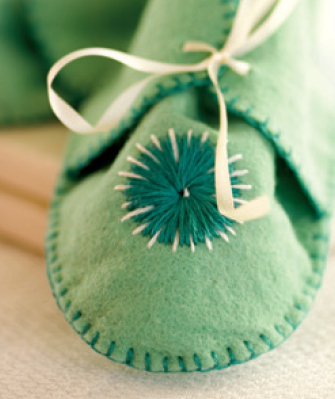
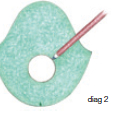
    Center the star template over the marked dot on the bootie front. Trace around the circle with the fabric marker (diag 2). Repeat for the second bootie front piece.

    STITCHING
    Secure two strands of the green thread on the back and bring it to the front on the marked circle. Take the needle to the back at the center. Work a second straight stitch next to the first, taking the needle to the back through the same hole at the center (diag 3). Continue to work straight stitches around the entire circle in this way. Stitch the white highlights, using two strands of thread. Secure the thread and bring it to the front a short distance from the edge of the star. Take the needle to the back halfway along and between two green stitches (diag 4).


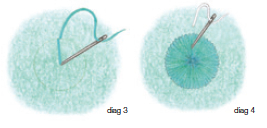
    Continue to work white highlights around the circle in this way, spacing the stitches 3mm (1/8″) apart.
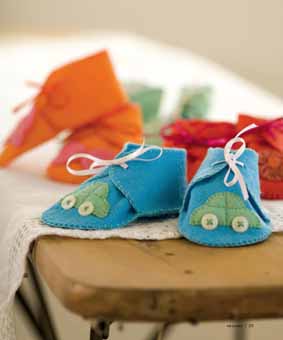
    MAKE THE PERFECT GIFT FOR A SPECIAL BABY
    By using the same small designs to decorate hats, singlets or bibs you can easily make a special gift that is sure to be treasured.
    CONSTRUCTING THE BOOTIES
    EDGING THE FRONT AND BACK PIECES
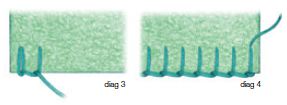
    Use two strands of thread in a color to complement the felt to sew the booties together with blanket stitch. Tie a knot at the end of the thread. Bring it to the front at one side of the upper edge of the bootie front piece. Take the needle to the back through the same hole, leaving a loop. Slide the needle through the loop (diag 1). Pull the thread through, anchoring the loop around the thread. Take the needle through the felt a short distance from the first stitch. Push it through until the tip appears beyond the felt edge, keeping the thread under the tip of the needle (diag 2).


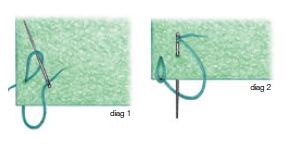
    Pull the thread through. Work a second blanket stitch around the edge of the felt a short distance from the first (diag 3). Continue along the edge in this way until reaching the opposite side. After the last stitch, bring the needle to the front through the same hole in the fabric to anchor the last stitch (diag 4). Work a tiny stitch, taking the needle to the back.


    Secure the thread under the stitches on the back. Work blanket stitch over the upper edge of the remaining front and two back pieces in the same way.
    ASSEMBLING THE BOOTIES
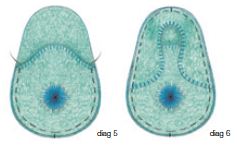
    Matching placement marks at the center front, pin and tack a bootie toe piece to a sole piece (diag 5). Matching placement marks at the center back, pin and tack a bootie back to the sole, overlapping the toe piece at the sides (diag 6).


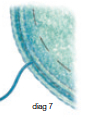
    Secure the thread inside the bootie. Slide the needle between the layers to bring it to the front at the edge (diag 7).
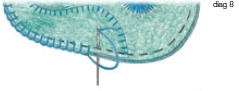
    Work blanket stitch in a similar way to the edges of the upper pieces, stitching through all layers around the edge of the bootie to join the upper pieces to the sole (diag 8). Carefully remove the tacking stitches.


    FINISHING
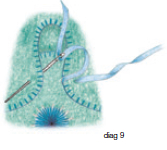
    Cut the length of ribbon in half. Thread one piece into the large needle. Take the needle to the back at one marked position of the bootie back. Bring the needle to the front at the marked position at the opposite side (diag 9). Unthread the needle. Tie the laces in a bow.

    Ultima modifica di Fra; 16-05-2011 alle 15:20

  4. Per questo Post, l'utente Nick-name e' stato ringraziato da:

    pasticcina (01-05-2011)

  5. #13
    L'avatar di lidiatara1
    lidiatara1 è offline Moderatrice
    Data Registrazione
    06-05-2008
    Località
    Meda
    Messaggi
    5,628
    Grazie
    1,686
    Ringraziato 1,661 volte in 1,127 Discussioni

    Predefinito

    Che meraviglie!!!
    mi è venuta un idea per il futuro fiocco della mia collega.... grazie!!!
    Lidia


  6. Per questo Post, l'utente lidiatara1 e' stato ringraziato da:

    chanellina (07-04-2011)

  7. #14
    L'avatar di manulella
    manulella è offline Utente Qualificato
    Data Registrazione
    30-11-2010
    Località
    Riviera del Brenta - VE
    Messaggi
    855
    Grazie
    755
    Ringraziato 744 volte in 357 Discussioni

    Predefinito

    Ciao a tutte, ho fatto parecchie cosine in feltro ma le scarpine no e devo dire che sono graziosissime!!! Grazie per questi post. Kiss Manu

  8. #15
    hotto è offline Utente Senior
    Data Registrazione
    10-10-2010
    Località
    MONZA
    Messaggi
    123
    Grazie
    42
    Ringraziato 10 volte in 9 Discussioni

    Predefinito

    Ciao a tutte, cerco il cartamodello per fare delle scarpine da elfo in feltro da indossare per la recita di mio figlio, misura 30. Grazie 1000 a chi mi potrà aiutare.
    Hotto

  9. #16
    L'avatar di Fra
    Fra
    Fra è offline Crocettina Silver
    Data Registrazione
    23-07-2010
    Località
    morigino - lecce-
    Messaggi
    1,804
    Grazie
    733
    Ringraziato 2,854 volte in 733 Discussioni

    Predefinito

    Ciao Hotto,
    qui troverai un tutorial in inglese, ma semplicissimo e con il cartamodello! Spero siano le scarpette che cercavi... buon lavoro!

    Ears to your elf! - allsorts

  10. Per questo Post, l'utente Fra e' stato ringraziato da:

    hotto (30-04-2011)

  11. #17
    hotto è offline Utente Senior
    Data Registrazione
    10-10-2010
    Località
    MONZA
    Messaggi
    123
    Grazie
    42
    Ringraziato 10 volte in 9 Discussioni

    Predefinito

    Ciao Fra, grazie per la risposta, le avevo viste ma non riesco a capire come farle indossare e come poi evitare che le "perda" quando cammina. Sono molto belle ma sono da bebè e mio figlio ha 7 anni, ecco perchè non le ho prese in considerazione. Se ti viene in mente qualcosa d'altro io ci sono. Grazie 1000...continuo a cercare sul web!

  12. #18
    L'avatar di Fra
    Fra
    Fra è offline Crocettina Silver
    Data Registrazione
    23-07-2010
    Località
    morigino - lecce-
    Messaggi
    1,804
    Grazie
    733
    Ringraziato 2,854 volte in 733 Discussioni

    Predefinito

    per la misura puoi semplicemente ingrandire il cartamodello quando lo stampi, per non perderle mentre cammnina ci sono 2 alternative:

    1) aggiungi una fascetta
    2) modifichi un po' il cartamodello in modo che il collo della scarpa sia più stretto!

    Se vuoi ci provo io a farlo!

  13. #19
    hotto è offline Utente Senior
    Data Registrazione
    10-10-2010
    Località
    MONZA
    Messaggi
    123
    Grazie
    42
    Ringraziato 10 volte in 9 Discussioni

    Predefinito

    Ciao, vedo che stasera anche tu non vai a dormire...grazie. La fascetta....non ho capito come si fà, pe quanto riguarda il collo più stretto??? Sinceramente sono nel panico. Se vuoi provare a farlo tu te ne sarei infinitamente grata. Non sono una brava, ma proprio stamattina mio figlio mi ha detto che per venerdi ha bisogno il vestito fa folletto!!!!!Grazie 1000 ...se vuoi ti mando la mia mail così magari ci sentiamo in privato. Hotto

  14. #20
    L'avatar di Fra
    Fra
    Fra è offline Crocettina Silver
    Data Registrazione
    23-07-2010
    Località
    morigino - lecce-
    Messaggi
    1,804
    Grazie
    733
    Ringraziato 2,854 volte in 733 Discussioni

    Predefinito

    facciamo così domattina mi metto all'opera... anche perchè se cambio il cartamodello poi devo sperimentarlo

    Solo una cosa però: devi dirmi la misura 30 a quanti cm corrisponde!!!

  15. Per questo Post, l'utente Fra e' stato ringraziato da:

    hotto (01-05-2011)

Pagina 2 di 5 PrimaPrima 1234 ... UltimaUltima

Discussioni Simili

  1. Risposte: 23
    Ultimo Messaggio: 31-10-2016, 21:04
  2. Risposte: 82
    Ultimo Messaggio: 14-10-2016, 06:42
  3. Punto Coccodrillo, tutorial, schema, idee, modelli
    Di miriam p nel forum Uncinetto
    Risposte: 76
    Ultimo Messaggio: 09-01-2015, 15:56
  4. Risposte: 2
    Ultimo Messaggio: 30-01-2012, 23:20

Chi Ha Letto Questa Discussione: 0

Segnalibri

Segnalibri

Permessi di Scrittura

  • Tu non puoi inviare nuove discussioni
  • Tu non puoi inviare risposte
  • Tu non puoi inviare allegati
  • Tu non puoi modificare i tuoi messaggi
  •