Risultati da 1 a 5 di 5

Discussione: Le prossime traduzioni

  1. #1
    Nick-name Guest

    Predefinito

    Crocheted Baby Sweater

    Crocheted Baby Sweater | Bundles Of Love

    © October 2004, Beth Koskie


    Materials:
    • 3-3.5 oz WW yarn
    • Size H crochet hook for newborn (I for 0-3 months)
    • 1 button, ¾”
    • Yarn needle
    • Sewing needle, thread for button
    Abbreviations:
    • Ch: chain
    • DC: double crochet
    • SC: single crochet
    • St: stitch
    Body:
    Starting with neckline, chain 37.
    Row 1: DC in 3rd ch from hook and in each of the next 4 chs, (DC, Ch1, DC) in next ch, DC in next 4 ch (for sleeve), (DC, Ch1, DC) in next ch, DC in next 12 chs, (DC, Ch1, DC) in next ch, DC in next 4 ch (for second sleeve), (DC, Ch1, DC) in next ch, DC in last 6 chs; Ch3, turn. (this Ch3 becomes the first st in the next row)
    Row 2: *Skip ch3 space, DC to first Ch1 space, work (DC, Ch1, DC) in Ch1 space, repeat
    from * three more times, DC to end, Ch3, turn.
    Rows 3-6: Repeat row 2.
    Row 7: DC in next 12 sts, work DC in Ch1 space, Ch1, skip to next Ch1 sp, DC in that space; DC in next 24 sts, DC in next Ch1 space, Ch1, skip to next Ch1 space, DC in that Ch1 space; DC in last 12 sts, Ch3, turn.
    Row 8: DC in each st and ch1 space across, Ch3, turn.
    Rows 9-17: DC across, Ch3, turn.
    At end of row 17, do not Ch3, turn. Ch1, turn to work up front of sweater, and work SC in each end of row and stitch all around sweater, working 3 sts in each corner space, join; end off.
    Sleeves:
    Attach yarn at Ch1 space at underarm, Ch2, work 23 DC around sleeve (24 sts total); join,
    ch2, turn.
    Rounds 2-10: DC around, join, Ch2, turn.
    Round 9: Counting Ch2 as first DC, *DC in 4 sts, DC over next 2 sts together, repeat from * around (20 sts); join, Ch1, do NOT turn.
    Round 10: SC around, join, end off.
    Work second sleeve the same.
    Finishing:
    Weave in ends.
    Sew button to top of one front side, across from a hole that will fit the button.
    Ultima modifica di Nick-name; 14-07-2011 alle 07:39

  2. #2
    Nick-name Guest

    Predefinito


    Designed By Nicky Epstein

    http://www.hgtv.com/decorating/chris...han/index.html

    COPERTINA NATALIZIA


    Designed By Nicky Epstein
    Materials and Tools:Caron Dawn Sayelle, Art. A3075 (3 1/2 oz. skein); a yarn made of 100% Monsanto Acrylic Fiber
    7 skeins #319 off white
    4 skeins #410 Christmas green
    3 skeins #406 Christmas red
    knitting needles, #8 and circular needle #7, or size required to knit to gauge
    large-eye yarn needle for embroidery


    Size: About 42" x 54", including Border.
    Gauge: 9 sts = 2" (stockinette stitch on #8 needles).
    Notes: For check square, wind several balls each of Christmas green and off white; use a separate ball for each color section. Do not carry unused colors across; rather, drop unused color to wrong side and pick up when again needed on return row. When changing colors, always bring up new color from under dropped color to prevent holes.
    Steps:
    Solid block:
    Make 10. With #8 needles and off white, cast on 45 sts. Work in stockinette stitch (k on right side, p on wrong side) until 11" from beg. Bind off.
    Leaves:
    Make 30. With #8 needles and Christmas green, cast on 7 sts.
    Row 1: K 3, yo, k 1, yo, k 3.
    Row 2 and all even-numbered rows: Purl.
    Row 3: K 4, yo, k 1, yo, k 4.
    Row 5: K 5, yo, k 1, yo, k 5.
    Row 7: Bind off 3 sts, k 2, yo, k 1, yo, k 6.
    Row 8: Bind off 3 sts, p 8.
    Row 9: Repeat Row 3.
    Row 11: Repeat Row 5.
    Row 13: Repeat Row 7.
    Row 14: Repeat Row 8.
    Row 15: Repeat Row 3.
    Row 17: Repeat Row 5.
    Row 19: Bind off 3 sts, k 9.
    Row 20: Bind off 3 sts, p 6.
    Row 21: K 2 tog, k 3, k 2 tog.
    Row 23: K 2 tog, k 1, k 2 tog.
    Row 25: Sl 1, k 2 tog, psso.Berries:
    Make 50. With #8 needles and Christmas red, cast on 1 st. K into front and back of st until there are 5 sts on needle.
    Beg with k row, work in stockinette stitch on 5 sts for 5 rows.
    Next row: Pass 2nd, 3rd and 4th sts over first st. Tie off.
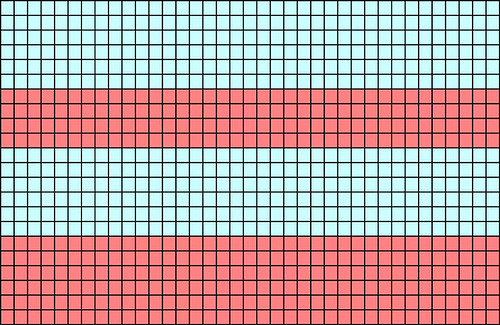
    Check block:
    Make 10. With #8 needles and off white, cast on 45 sts.
    Row 1 (right side): Join Christmas green and k 15, join off white and k 15, join another ball of Christmas green and k 15.
    Row 2 (wrong side): P 15 Christmas green, p 15 off white, p 15 Christmas green.
    Row 3: K 15 green, 15 white, 15 green.
    Row 4 through 20: Repeat Rows 2 and 3, ending with Row 2.
    Row 21 (right side): K 15 off white, k 15 Christmas green, k 15 off white.
    Row 22: P 15 white, p 15 green, k 15 white.
    Row 23 through 40: Repeat Rows 21 and 22.
    Rows 41 through 60: Beg with Row 3, repeat Rows 2 and 3. At end of last row, bind off.Finishing:
    Solid blocks: With cast-on edge at bottom, arrange three leaves on each solid block-first leaf (with point facing down) should be about 1 1/4 inch from right-hand side edge and about 1 1/2 inches from bottom edge, second leaf about 1 1/2 inch from top edge and 3/4 inch from side edge; third leaf centered between. Sew leaves in place. Using large-eye yarn needle and one strand Christmas Green, embroider stems in place working either straight stitch or outline stitch. Arrange berries near tops of leaves and sew in place.
    Assembling blocks: Alternating solid blocks and check blocks (with cast-on edge always at bottom), sew blocks together into a 4 x 5 block unit.
    Edging: With circular needle #7 and Christmas red, cast on 2 sts.
    Row 1: K 2.
    Row 2: Yo, k 2.
    Row 3: Yo, k 3.
    Row 4: Yo, k 4.
    Row 5: Yo, k 5.
    Row 6: Yo, k 6.
    Row 7: Yo, k 7.
    Row 8: Yo, k 8.
    Row 9: Yo, k 9.
    Row 10: Yo, k 10.
    Row 11: Yo, k 11.
    Row 12: Yo, k 12-1 point completed. Cut yarn and leave finished point at center of needle. On same needle, cast on 2 sts and repeat Rows 1 through 12 to complete second point. Leaving all points on needle, continue working points until there are a total of 28 points. At end of last point, do not cut yarn. Turn and k across all points on needle-all points joined.
    Next 2 Rows: K all sts. Weave sts across short end of afghan. Work another border of 28 points and weave across remaining short edge. For long edges of afghan, make two borders of 44 points each. Weave in place as before.
    Ultima modifica di Nick-name; 12-09-2011 alle 10:46 Motivo: ins nuovo schema

  3. #3
    Nick-name Guest

    Predefinito

    f. pea: free pattern friday: scrappy socky stripey cardi

    materials

    leftover sock yarn in 3 colors
    color A (solid) – up to 200 yd (shown: Tess Super Sock & Baby)
    color B (self-striping) – up to 50 yd (shown: Regia Kaffe Fassett Landscape in color “Caribbean”)
    color C (variegated) – up to 50 yd (shown: Lorna’s Laces Shepherd Sock Multi in color “Gold Hill”)
    size 2 /3.0mm needles (circular and DPN)
    size 1 /2.5mm needles (circular)
    size 1 crochet hook (2.35 mm)
    2 buttons (3/4 inch)
    sewing needle & thread
    tapestry needle

    gauge: 7 stitches and 9 rows / inch

    size: 0-6 (6-12, 12-18, 24) months

    finished measurements:
    chest circumference: 18.5 (19, 20.5, 21.5) inches
    back waist length: 10 (11, 11.5, 12) inches
    sleeve: 6.5 (7.5, 8, 8.5) inches

    stripe patterns
    (as shown in photos – make yours however you like!)

    color key:


    yoke stripes:


    body stripes:


    sleeve stripes:


    knitting instructions

    Using larger needles and color A, CO 2 (3, 3, 4), PM, CO 16 (17, 17, 18), PM, CO 24 (28, 30, 32), PM, CO 16 (17, 17, 18), PM, CO 2 (3, 3, 4).
    You will have cast on a total of 60 (68, 70, 76) st.

    Row 1: Kfb of first stitch, * K to 1 st before marker, Kfb, slip marker, Kfb. Repeat from * to final stitch. Kfb of final stitch. (10 st inc.)
    Row 2: Knit across.

    Repeat these last 2 rows until you have 34 (38, 40, 44) st between the back markers.

    Next row: *K to 1 st before marker, Kfb, slip marker, Kfb. Repeat from * to final stitch. CO 1 (2, 3, 1) stitches to tip of needle.
    Next row: Knit across. CO 1 (2, 3, 1) stitches to tip of needle. You will have 120 (130, 134, 146) st total.

    Next row: Work as for previous increase row, without adding the cast on to the end. (8 stitches inc.)
    Next row: Knit across.

    Repeat these last 2 rows until you have 60 (62, 66, 70) st between the back markers.

    divide for sleeves

    K to first marker, remove marker, place shoulder st on a length of scrap yarn.
    CO 6 (7, 7, 7) st to tip of needle, remove next marker, join to back stitches.
    K to next marker, remove marker, place shoulder st on a length of scrap yarn.
    CO 6 (7, 7, 7) st to tip of needle, remove next marker, join to remaining front stitches.
    K to end.

    Complete your color repeat in garter stitch.

    Change to color A and stockinette stitch, knitting the body in varying stripes of colors A and C until the body measures 9.75 (10.75, 11.25, 11.75) inches. Change to color C and knit 4 rows in garter stitch. BO.

    sleeves

    Place the held stitches onto your DPN’s. Using the correct color to maintain your color repeat from the body stitches, pick up and knit the 6 (7, 7, 7) armpit stitches you cast on when dividing for sleeves. Place marker.

    You will complete your color repeat in garter stitch, just as you did for the body. This time, when you change to stockinette stitch, you’ll be knitting in alternating rows of colors A and B, starting with color A.

    At the same time:
    K 3 rows.
    Decrease row: K1, SSK, K to last 3 stitches, K2tog, K1. (2 st dec).
    Next three rows: Knit.

    Continue in this manner, decreasing 2 stitches on every fourth round until 40 (42, 44, 48) stitches remain. Do not decrease any further.

    Knit until sleeve measures 6.25 (7.25, 7.75, 8.25) inches.
    Change to color C, K 4 rows in garter stitch. BO loosely.


    button bands

    Using smaller needles and color C, pick up 3 out of every 4 stitches along the right front selvedge (about 70, 78, 82, 86 stitches).
    Knit 3 more rows in garter stitch. BO.
    Repeat for left side.

    collar

    Starting at the right front, using color C and smaller needles, pick up and knit the collar stitches.

    Pick up and knit 14 (16, 17, 18) stitches from the right front, 16 (17, 17, 18) stitches from the right shoulder, 24 (28, 30, 32) stitches across the back, 16 (17, 17, 18) stitches from the left shoulder, and 14 (16, 17, 18) stitches from the left front.

    Turn work, K 3 more rows in garter stitch.
    Final row: K2tog, bind off all stitches until 2 st rem, SSK, BO.

    buttons

    Sew first button onto right side of button band, 1/2 inch down from neck line. Sew second button 2 inches below first button (measuring from centers of buttons).

    button loops

    Using crochet hook and color C, attach the yarn to the left button band on the wrong side of the sweater, being sure to place the loop where it will line up with the first button.
    Make a chain of 11 ch with your crochet hook (or the proper length to fit your button). Attach chain to back side of button band, secure and weave in ends.
    Repeat for the second loop, lining up with the second button.


    finishing

    Weave in loose ends. Block sweater into shape.


    This sweet sun hat will take your baby or toddler from the playground to the beach and back again. The brim is worked in a tight gauge to give it some firmness, while the body is knit in a looser gauge with a simple but pretty eyelet lace design that adds a little ventilation. Add the optional ties if your little one likes to yank off hats (and who doesn’t?). This is a fun, quick summer knit. Find a bright summer color that you like, and use a firm, washable cotton or cotton/linen blend yarn.

    materials
    1 ball Lion Cotton or similar worsted-weight cotton yarn
    US size 3 double-pointed needles (3.25 mm)
    US size 7 double-pointed needles (4.5 mm)
    US size 7 crochet hook (4.5 mm) – or whatever you have on hand that’s close
    tapestry needle
    stitch markers in 2 colors
    Use whichever needle sizes you need to get the correct gauge!

    gauge
    larger needles: 15 stitches / 24 rows / 4 inches
    smaller needles: 20 stitches / 29 rows / 4 inches

    sizes
    0-6 mos (6-18 mos, 18 mos – 3 years, 4-6 years)

    measurements
    0-6 mos: 14 inches
    6-18 mos: 16 inches
    18 mos – 3 years: 18 inches
    4-6 years: 21 inches

    brim
    Using smaller needles, *cast on 19 (20, 21, 23) stitches, place a marker, repeat from * until you have 114 (120, 138, 150) stitches.
    Place a marker in a different color to mark the end of the round, and join to knit in the round. Knit 4 rounds in stockinette stitch (K every round).
    R5: K1, P1 to end (this ridge will stop the brim from rolling any further).
    R6: Knit

    Decrease round: *K2tog, K to 2 stitches before the next marker, SSK, slip marker. Repeat from * to end. 12 stitches decreased.
    Next round: Knit
    Repeat these last two rows until 54 (60, 66, 78) stitches remain.

    hat body
    Change to larger needles.
    Knit one round, removing the markers as you go (leaving in place the marker that marks the start of each round).

    Next round: Knit, adding the eyelets for ties as you go (optional!).

    How to add eyelets: K 14 (15, 16, 19), YO, K2tog. K 24 (28, 30, 38), YO, K2tog. K to end.
    Even if you’re not sure whether you will want to use the ties, I think it makes sense to go ahead and make the eyelets, so that they’re there if you need them. They won’t look funny if you don’t end up using them.

    Knit 2 more rounds.

    Next round:

    For the 18 mos-3 yrs size: Knit this round, decreasing by 2 stitches, spacing the decreases evenly throughout the round.

    For the 0-6 mos (6-18 mos, 4-6 yrs) sizes: Knit this round, increasing by 2 (4, 2) stitches, spacing the increases evenly throughout the round.

    For all sizes: 56 (64, 64, 80) stitches remain.

    Next round, begin Quatrefoil pattern.

    quatrefoil pattern
    Round 1 and all odd rounds: Knit
    R2 and 3: Knit
    R4: K3, *YO, SSK, K6. Repeat from * until 3 stitches remain in the round. K3.
    R6: K1, * K2tog, YO, K1, YO, SSK, K3. Repeat from * until 2 stitches remain in the round. K2.
    R8: Repeat round 4.
    R10: Knit.
    R12: K7, *YO, SSK, K6. Repeat from * until 1 stitch remains in the round. K1.
    R14: K5, * K2tog, YO, K1, YO, SSK, K3. Repeat from * until 3 stitches remain in the round. K3.
    R16: Repeat round 12.

    For the 0-6 mos size, you will only knit the quatrefoil pattern once. For the 6-18 mos and 18 mos-3 yrs sizes, repeat rows 1-8 of the quatrefoil pattern one time.
    For the 4-6 yrs size, repeat the whole quatrefoil pattern one time.
    Continue knitting in stockinette stitch until hat measures 4.25 (4.75, 5.5, 7.75) inches from the point where you changed to larger needles.

    decrease for crown
    R1: *K2, K2tog. Repeat from * to end.
    R2: *K1, K2tog. Repeat from * to end.
    R3: *K2tog. Repeat from * to end.
    Repeat row 3 until there are 10 stitches remaining on your needles. Trim your yarn tail to about 6 inches and pull through the stitches, leaving a small eyelet open to top off the crown. Fasten securely inside and weave in the end.


    ties (optional)
    Using the crochet hook and 2 strands of yarn held together, crochet a single-chain chain that measures about 28 (32, 36, 42) inches long. Tie off tightly, weave in and trim ends. The chain will run around the outside of the hat across the back, down through one eyelet and back up through the other, passing under the baby’s chin (it does not run around the front side of the hat). Tie it in a bow on the outside of the hat where baby can’t easily reach it – for a crafty baby, this may mean that you may need to tie the bow all the way on the back side of the hat rather than just above the eyelet on one side. Babies can be awfully crafty, can’t they?

    finishing
    Weave in any loose yarn ends. Wash and block your hat.

    I have found through painful experience that many bright cotton yarns are not particularly color-fast, so do wash this separately the first few times to make sure the color doesn’t run and ruin the rest of your laundry. You might consider adding a small amount of white vinegar to the water when you block the hat, to help set the color (unless the yarn ball band gives you different instructions).

    non-commercial bit: These are free patterns and you are welcome to use them for all the non-commercial purposes you like. However, you may not reproduce the patterns to sell, and you may not sell what you make with them. You may donate what you make with them to charity, and you may use them for charity fundraisers only if 100% of the proceeds are donated to the charity (and by charity I don't mean your kid's college fund). Thanks for understanding!


    size: girls' 2 (4, 6)

    measurements:
    chest: 27 (30, 31.5) inches
    back length: 12 (13, 14) inches

    materials
    1 (1, 2) ball/s Cascade Sierra (color B) 100g/192 yd
    2 balls Cascade Sierra Quatro (color A) 100g/192 yd
    size 7 (4.5 mm) circular needles
    size 5 (3.75 mm) circular needles
    tapestry needle
    3 (three) 1/2-inch buttons

    gauge: 16 st / 26 rows / 4 inches over the K4, P2 rib (lightly stretched)

    broken block pattern
    (8 row pattern repeat)
    R1 and R3: *(K4, P2), Rep from * to end.
    R5 and R7: *(P2, K4), Rep from * to end.
    All even rows: Knit the K's and Purl the P's.

    cast on
    You will start with the ruffle at the bottom edge. Using color B and larger needles, CO 248 (274, 288) st.
    K 2 rows (garter st).
    R3, 5: Purl
    R4: Knit
    R6: K2tog every st to end. 124 (137, 144) st rem.
    R7: Purl
    R8: Change to color A. *(K4, P3). Rep from * to end. K2tog 1 (0, 0) times. K to end.
    R9 (WS): K all P's and P all K's.
    Cont in K4, P3 patt for 6 rows (each RS row begins and ends with K4).
    Next RS row: K4, *(P2tog, P 1, K4). Rep from * to end. 106 (118, 124) st rem.
    Cont in K4, P2 patt until piece measures 6.5 (7, 7) in from cast on row.


    (high) waistband
    Next RS row: Change to color B. K to end.
    WS: K to end.
    Next RS row: Change back to color A and beg Broken Block patt. Patt 4 rows.

    divide for sleeves - right side
    Patt 26 (29, 30) st, turn. Place rem st on a st holder - you will now be working just these 26 (29, 30) st.
    Next 2 WS rows: BO 3, patt to end.
    Next WS row: K2 tog 0 (1, 1) times, patt to end. 20 (22, 23) st rem.

    shape neck - right side
    Cont in patt until armhole meas 3.5 (4, 4.5) in.
    Next RS row: BO 4 (4, 6), patt to end.
    Next RS row: BO 2 (2, 2), patt to end.
    Next 2 RS rows: K2tog 1 (2, 2) time(s), patt to end. 12 (12, 13) st rem.
    Cont in patt until armhole meas 5.5 (6, 7) in.
    Place the 12 (13) shoulder st on a holder.

    back
    Join yarn, BO 3, Patt 49 (57, 61) st, turn work. Leave rem st on holder.
    Next row: BO 3, Patt to end.
    At start of next 2 rows, BO 2 (2, 3).
    Next 2 (1, 1) rows, dec 1 st at each end. 40 (44, 50) st rem.
    Cont in patt until armhole meas 4.5 (5, 5.5) in.

    shape back neck
    (RS): Patt 16 (17, 19), BO 8 (10, 12), Patt to end
    Next row and all WS rows: K across in patt
    Next RS row: BO 2, patt to end.
    Next 2 (3, 2) RS rows: Dec 1 (1, 2), Patt to end.
    Cont in patt until armhole meas 5.5 (6, 7) in. Place rem 12 (12, 13) st on holder.
    Repeat in reverse for other side of neck. Place rem 12 (12, 13) st on holder.

    shape left side
    Join yarn and repeat as for right side, above.

    Using the 3-needle bind off method, join shoulder seams.


    sleeves
    You will pick up all the armhole stitches and create a small ruffled sleeve cap using short rows. The cap sleeve is knit back & forth, rather than in the round. You will sew the small underarm seam when finished.
    Using color B and smaller needles:
    Starting in the middle of the underarm, pick up and knit the BO st as you move up the front of the garment. Pick up and knit 3 out of every 4 selvedge st, all the way around the front and back of the armhole until you meet the BO st on the other side. Pick up and knit all the remaining BO st until you reach your starting point. Do not join. You will have about 60 (70, 80) st on the needle.

    Turn work and knit 3 rows in garter st (not in the round).

    Next RS row: BO 9, then Kfb every st until 9 st rem. Place these rem 9 st on holder and turn work.

    Next row (WS): Purl. As you work your way back, place a st marker at the center top of the shoulder. P to 20 (24, 26) st beyond M, wrap & turn.
    Next row (RS): K to 20 st beyond M, wrap & turn.

    Next row (WS): P to 4 st beyond the last turning point, wrap & turn.
    Next row (RS): K to 4 st beyond the last turning point, wrap & turn.
    Repeat these last two rows 2 more times.

    Next row (WS): P to end.
    Turn work and K 4 rows in garter st.
    Next RS row: BO all st, incl the st rem on holder.
    Sew underarm seam.

    Repeat for second sleeve cap.

    button bands
    Using smaller needles and color B, pick up 3 out of every 4 st up the right side of the garment - approx 52 (57, 60) st.
    Knit 3 rows in garter st. BO.

    Repeat on the left side, picking up st and knitting one row.
    R2 (buttonhole row) : K to waistband. K1, YO, K2tog. K to halfway point (towards neckline), YO, K2tog. K to last 4 st, YO, K2tog, K to end.
    R3: Knit.
    R4: BO.

    collar
    Using smaller needles and color B, starting at right front, pick up and knit about 17 (18, 20) st on right front. Pick up and knit about 22 (26, 30) back neck st and about 17 (18, 20) st on left front.
    K 3 rows in garter st. BO.

    finishing
    Mark button placement and sew on buttons.
    Weave in all loose ends.

    important notice: This is a free pattern and you are welcome to use it for all the non-commercial purposes you like. However, you may not reproduce this pattern to sell, and you may not sell what you make with it. You may donate what you make with it to charity, and you may use it for charity fundraisers only if 100% of the proceeds are donated to the charity (and by charity I don't mean your kid's college fund). Thanks for understanding!

    CHIESTA AUTORIZZAZIONE ALLA TRADUZIONE
    Ultima modifica di Nick-name; 24-09-2011 alle 13:39

  4. #4
    Nick-name Guest

    Predefinito

    Vi informo che ho inserito diversi modelli tradotti nella raccolta 0-3 anni, dei cardigan top down nella racolta donna e dei cappellini dentro la raccolta cappelli sciarpe muffole....

    i modelli che restano da tradurre sono in attesa in quanto l'autrice sta apportando modifiche e mi ha chiesto di aspettare.....

  5. I seguenti 2 utenti ringraziano Nick-name per questa discussione:

    Coira (25-09-2011), lauram (25-09-2011)

  6. #5
    Nick-name Guest

    Predefinito


    Free Cabled Cardigan Knitting Pattern

    This cardigan makes a wonderful lightweight jacket or warm sweater for baby. Machine washable and oh-so-soft, the yarn comes in a wonderful array of colors and is shown off to best advantage in a delicate cable pattern.
    Size

    0-6 months: chest 19" (48.5cm), length 9" (23cm)
    6-12 months: chest 22" (56cm), length 10" (25.5cm)
    2 years: chest 25" (63.5cm), length 121/2" (31.5cm)
    3 years: chest 28" (71cm), length 131/2" (34.5cm)
    What You'll Need

    Yarn: Worsted weight yarn, about 504 [504, 588, 672] yards (462m [462m, 538m, 614.5m])
    We used: Lion Brand Yarns Cashmere Blend (72% merino wool, 14% cashmere, 14% nylon; 84 yards [77m] per 40g skein): #105 Light Blue, 6 [6, 7, 8] balls
    Needles: US size 8 (5mm); US size 8 (5mm) double-pointed, set of 2 (for closing hood seam)
    Notions: 3 stitch holders; tapestry needle; 10" (25.5cm) long separating zipper in color to match yarn; long sewing pins; sewing needle and thread in color to match yarn
    Gauge

    21 stitches and 24 rows=4" (10cm) in Baby Cable Ribbing Stitch
    Notes

    • Instructions are given for smallest size; numbers for larger sizes are in brackets. When only 1 number is given, it applies to all sizes.
    • A "cable 2 twist" is worked as follows: Knit 2 together leaving stitches on left needle, insert right needle between 2 stitches just knitted together and knit the first stitch again, slip both stitches from left needle.
    • Follow the Baby Cable Ribbing Stitch pattern instructions written specifically for the left front, right front, and hood pieces as they include slip stitch selvage instructions that are not included in the Baby Cable Ribbing Stitch pattern given below.
    Baby Cable Ribbing Stitch

    Rows 1 and 3 (wrong side): Knit 2, *purl 2, knit 2; repeat from * to end of row.Row 2: Purl 2, *cable 2 twist (see "Notes"), purl 2; repeat from * to end of row.Row 4: Purl 2, *knit 2, purl 2; repeat from * to end of row.
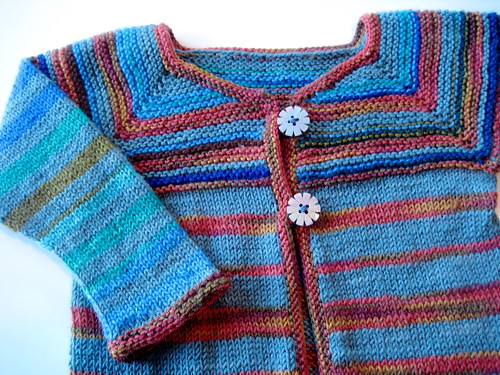
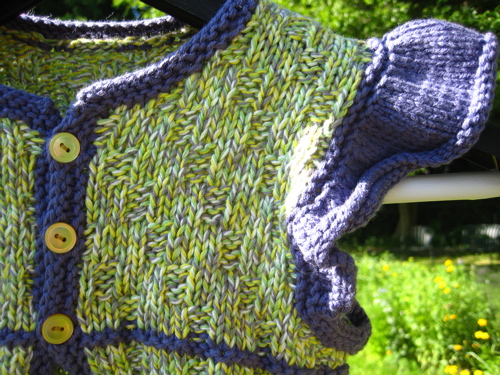
    This easy-to-follow pattern makes knitting the cabled cardigan a cinch.


    Making the Cabled Cardigan

    BackCast on 50 [58, 66, 74] stitches.Work the Baby Cable Ribbing Stitch pattern starting with row 1. Continue in pattern until piece measures 9" [10", 121/2", 131/2"] (23cm [25.5cm, 32cm, 34cm]) or desired length. Place stitches on holder.
    Left front (as worn)Cast on 26 [30, 34, 38] stitches.
    Rows 1 and 3 (wrong side): Slip 1 purlwise with yarn in front, knit 1, *purl 2, knit 2; repeat from * to end of row.Row 2 (right side): Purl 2, *cable 2 twist, purl 2; repeat from * to last 2 stitches, purl 1, knit 1.
    Continue in established pattern until piece measures about 80 [9", 11", 111/2"] (20.5cm [23cm, 28cm, 29cm]) or desired length, ending with a right-side row.
    Keeping in pattern, work neck shaping as follows:
    Next wrong-side row: Bind off 4 stitches at neck edge 1 time, work remaining stitches in pattern. (22 [26, 30, 34] stitches)All right-side rows: Work in established pattern, adjusting as necessary to accommodate changing stitch count.Next wrong-side row: Bind off 3 stitches at neck edge, work remaining stitches in pattern. (19 [23, 27, 31] stitches)
    Next wrong-side row (2 smallest sizes only): Bind off 2 stitches at neck edge, work remaining stitches in pattern. (17 [21] stitches)
    Next 2 wrong-side rows (2 largest sizes only): Bind off 2 stitches at neck edge on this row and the next right-side row, work remaining stitches in pattern. (23 [27] stitches)
    Next wrong-side row (all sizes): Knit 2 together at neck edge, work remaining stitches in pattern. (16 [20, 22, 26] stitches)
    Next wrong-side row (largest size only): Knit 2 together at neck edge, work remaining stitches in pattern. (25 stitches)
    Work even in pattern until piece measures about 9" [10", 121/2", 131/2"] (23cm [25.5cm, 32cm, 34cm]). Place 16 [20, 22, 25] shoulder stitches on holder.
    Right front (as worn)

    Cast on 26 [30, 34, 38] stitches.
    Rows 1 and 3 (wrong side): Slip 1 purlwise with yarn in front, knit 1, *purl 2, knit 2; repeat from * to end.
    Row 2 (right side): *Slip 1 purlwise with yarn in front, purl 1, cable 2 twist, purl 2; repeat from * to end of row.
    Row 4: Slip 1 purlwise with yarn in front, purl 1, *knit 2, purl 2; repeat from * to end of row.
    Continue in pattern until piece measures 8" [9", 11", 111/2"] (20.5cm [23cm, 28cm, 29cm]) or desired length, ending with a wrong-side row.
    Next right-side row: Bind off 4 stitches at neck edge 1 time, work remaining stitches in pattern. (22 [26, 30, 34] stitches)
    All wrong-side rows: Work in established pattern, adjusting as necessary to accommodate changing stitch count.
    Next right-side row: Bind off 3 stitches at neck edge, work remaining stitches in pattern. (19 [23, 27, 31] stitches)
    Next right-side row (2 smallest sizes only): Bind off 2 stitches at neck edge, work remaining stitches in pattern. (17 [21] stitches)
    Next 2 right-side rows (2 largest sizes only): Bind off 2 stitches at neck edge on this row and the next right-side row, work remaining stitches in pattern. (23 [27] stitches)
    Next right-side row (all sizes): Work slip slip knit decrease at neck edge, work remaining stitches in pattern. (16 [20, 22, 26] stitches)
    Next right-side row (largest size only): Work slip slip knit decrease at neck edge, work remaining stitches in pattern. (25 stitches)
    Work even in pattern until piece measures 9" [10", 121/2", 131/2"] (23cm [25.5cm, 32cm, 34cm]). Place 16 [20, 22, 25] shoulder stitches on holder.
    Sleeves (make 2)

    Cast on 26 [30, 34, 38] stitches.
    Work the Baby Cable Ribbing Stitch pattern while at the same time using the make 1 increase method to increase 1 stitch at each sleeve edge every fourth row 10 [11, 12, 13] times. (50 [52, 58, 64] stitches)
    Continue in pattern until sleeve length measures 63/40 [71/20, 83/40, 90] (17cm [19cm, 22cm, 23cm]). Bind off.
    Repeat for second sleeve.
    Working from armhole toward neck, seam shoulder stitches of left front to shoulder stitches of back using 3-needle bind-off technique. Repeat seaming for right shoulder. Leave remaining 20 [20, 24, 26] back neck stitches on holder for neck (the stitch count includes the remaining stitch on each shoulder after completing the bind-off).
    Hood

    Beginning at right center front neck opening (as worn) with right side facing, pick up 42 [42, 46, 50] stitches around neck edge toward the left center front (as worn).
    Row 1 (wrong side): Slip 1 purlwise with yarn in front, knit 1, (purl 2, knit 1 into front and back of next stitch) 4 times, (purl 2, knit 2) 3 [3, 4, 5] times, (purl 2, knit 1 into front and back of next stitch) 4 times, purl 2, knit 2. (50 [50, 54, 58] stitches)
    Row 2: Slip 1 purlwise with yarn in front, purl 1, *cable 2 twist, purl 2; repeat from * until 4 stitches remain, cable 2 twist, purl 1, knit 1.
    Row 3: Slip 1 purlwise with yarn in front, knit 1, *purl 2, knit 2; repeat from * to end of row.
    Row 4: Slip 1 purlwise with yarn in front, purl 1, *knit 2, purl 2; repeat from * until 4 stitches remain, knit 2, purl 1, knit 1.
    Row 5: Slip 1 purlwise with yarn in front, knit 1, *purl 2, knit 2; repeat from * to end of row.
    Repeat rows 2-5 until hood measures 71/2" [8", 81/2", 9"] (19cm [20.5cm, 21.5cm, 23cm]) in length.
    Divide hood stitches in half, placing 25 [25, 27, 29] stitches each onto their own double-point needle. Holding double-point needles parallel to each other with wrong sides of fabric facing (right sides together), join the stitches from both needles using the 3-needle bind-off technique to close the hood top.
    Finishing the Cabled Cardigan

    Center top of sleeves on shoulder seams and with yarn threaded on tapestry needle use mattress stitch to attach sleeves to body. Sew side and sleeve seams with mattress stitch. Pin zipper in position, aligning bottom of zipper with bottom edge of knitted pieces and placing vertical edges of center front knitted pieces next to the teeth. If the zipper extends past the top edge, separate the zipper and trim the top of each side to match the exact length. Using matching color sewing thread and sewing needle, stitch a dozen or so times around an individual tooth just below the trimmed edge to create a stop for the zipper pull. Using sewing thread and sewing needle and with right side facing, backstitch zipper in place along the vertical edge of the knitted fronts. Whipstitch edges of zipper tape in place with wrong side facing. Remove all pins. Weave in all loose ends to wrong side of sweater.
    TLC Home "Free Cabled Cardigan Knitting Pattern"

Discussioni Simili

  1. Richieste traduzioni
    Di Nick-name nel forum Modelli a Maglia
    Risposte: 22
    Ultimo Messaggio: 05-09-2012, 08:57
  2. Info per traduzioni
    Di Nick-name nel forum Modelli a Maglia
    Risposte: 0
    Ultimo Messaggio: 03-02-2011, 18:53

Chi Ha Letto Questa Discussione: 1

Tag per Questa Discussione

Segnalibri

Segnalibri

Permessi di Scrittura

  • Tu non puoi inviare nuove discussioni
  • Tu non puoi inviare risposte
  • Tu non puoi inviare allegati
  • Tu non puoi modificare i tuoi messaggi
  •